

This chapter covers the administration of group features found in Halloo Office and FlexCall Center accounts. One or more users in these plans will have administrator status allowing them to perform maintenance on the entire account, add new users extensions, manage the auto attendant and more. The person who signed up for the service (usually extension-01) is by default an administrator of the account.
Setting up a brand new Office account is not difficult, but it’s best that you visualize your setup before you try to implement it. Follow these steps in order to set up a new Halloo Office or FlexCall Center account.
Note that as the first administrator of the account, you have the power to create other extensions and modify the auto attendant. In most cases, your account will be set up with x00 as your Auto Attendant, and x01 as your own (user) extension.
In the steps below, you will be adding other users to your account and configuring your auto attendant, so be sure that you know how to jump between extensions using the “All Extension” page or “Ext. Quick Jump” menu.
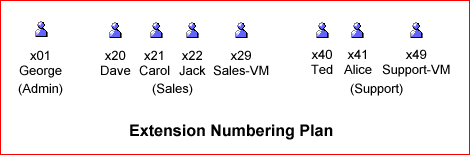
Each extension will have their own username, PIN and extension number. Organize your extension numbers logically—for example x20-29 for your sales team, x40-49 for support, etc.
Each extension will also have its own username and PIN so that they can sign in to the My.Halloo.Com website. Usernames cannot be changed once created. You might want to pick a name like barbara or bjensen for a username, or use a generic name like sales1 if you expect frequent turnover in that function. Be sure to use a different PIN for each extension to safeguard the privacy of each user’s voice mail.
You can also create voice mail only
extensions to separate your incoming calls into
different “departments” like Sales or Accounting. These
are often useful for collecting messages when a no one is available
in a hunt group. For example, create sales-vm, x29,
to collect group voice messages in case none of your sales agents
are available. You, as the administrator of the account, can listen
to voice recordings for any extension, including these generic department
mail boxes.
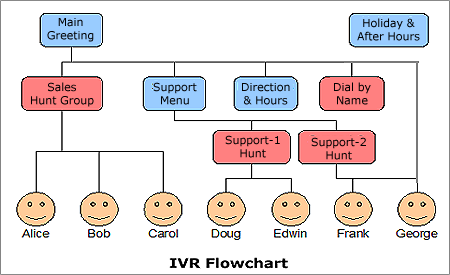
You should write the scripts for each menu before before attempting to program the Halloo auto attendant. For example, in the “Main Greeting” menu, you might have:
Thank you for calling the Busy Biz Corporation. For Sales press 1. For Support press 2. For the company dial by name directory, press 8. If you know your party’s extension, press 9 followed by the extension number.
Don’t worry about programming the Halloo system yet. Just write the words for all of your menus before proceeding with the next step. Note, that you should try to limit the number of the choices in each menu to fewer than 5 options. This will help your callers navigate your system more easily. Always place the most common selections first to reduce frustration for your callers.
In the diagram above, the red boxes are “special menus” which don’t require scripts. They are preprogrammed by Halloo to perform special functions such as Dial-by-Name.
In most cases, it is a better idea to use the Hunt Group feature than to name individuals in your organization. For example,
…Press 1 for sales…is preferable to
…Press 1 for Alice. Press 2 for Bob. Press 3 for Carol.This gives you the flexibility to have sales calls handled by more than one person, and allows for easier administration in case you hire new employees.
When you create your menus, type in the text that you came up with in the previous step. The system will generate a text-to-speech computer recording of your script. This is just a temporary place holder until you record your “real” greeting yourself.
It is important to create all menus before programming the menu events. Following the example above, be sure to create the “Main Greeting”, “Support Menu”, “Directions”, and “Holiday” menus first. Later you will add events to actually “wire up” the system so that the keypresses actually cause the system to jump through your system.
Note that you do not record the audio for a special menu. It is pre-recorded by Halloo. However, you will have to configure the hunt group menus so that the system knows where to direct the calls for each group.
Note that you can have “secret events” that aren’t announced in your script, but are known to your employees. For example, you might have option “7” jump to a high priority dispatcher in your company, but ordinary callers do not hear about that option when they dial in.
You should also add a timeout event to your menus so that your system do something like jump to your general voice mail extension in case the caller does not make a selection. In general, you should allow your callers at least 6 seconds before jumping in a timeout event. Remember that your callers may be using a cell phone or cordless phone where the buttons are on the handset, and it may take a few seconds to respond.
Callers also often press Zero even if that choice isn’t given to them. You should add an event for “0” to handle this situation.